CSV Import Guide
Step 1:
Download the Template
Start by downloading the LineItems CSV Template

Guide best completed on PC/Mac
(if on mobile: skip calendar steps)
Step 2:
Fill Out the Template
Open the template and complete as many fields as you can.
-
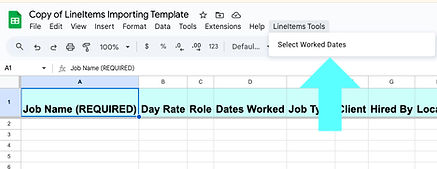
To enter worked dates, highlight the job’s "dates worked" cell in column D, Use the custom menu button “LineItems Tools”, then select “Select Worked Dates” to choose from the calendar that appears on the right. (you will need to authorize google sheets to run a script to display this calendar)
-
Each job should be listed on one row only.
-
The only required field is the Job Name. All other columns can be left blank if you don’t have the data.
-
If you’ve set defaults in the app (e.g., primary role or payment terms), those values will automatically be applied if the cells are left empty.


<--- Select Job's Dates
Click Save Dates --->

Should look like this
Step 3:
Save Your CSV
When finished, download and save your completed CSV to iCloud or another cloud service you can access from LineItems.

Step 4:
Import into LineItems
Open the app, go to the Settings tab, and select “Import .csv”. Locate and upload your file.
Step 5:
Review & Confirm
After upload, LineItems will check your data:
-
If errors are found, you can either import the successful jobs while skipping the errored rows, or cancel, correct the issues, and try again.
-
Duplicate jobs will not be imported (duplicates are identified by job name).
-
Jobs without a name will be imported as “Imported Job”. These unnamed jobs can be duplicated across multiple uploads.


